Tuesday, October 23, 2012

Progress Report 10.23.12 - Lighting and Road Crossing Projects Complete

Late last night, I installed the remaining LED lighting.  This complete's the layout lighting project.  I do need to permanently mount the power supplies and affix the feeder wires properly.  That shouldn't take long though.  Simply getting the upper level canopy constructed with the lights installed is an accomplishment.

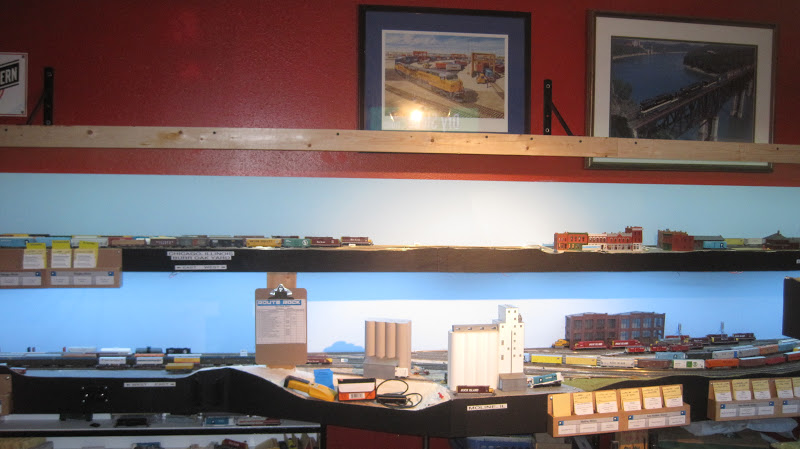
Overall view of the room with the upper level lighting canopy
The latest section to be installed last week.

The new lighting illuminates the upper level nicely.


Cat Cam view of the LED light strip.

Chicago Staging Yard was always dark in the past.  Not anymore!

Downtown Blue Island looking good under the new lights.

Another dark corner of the room in West Blue Island - looking good under the lights.

Pictures of the Road Crossing Update Project in Blue Island

New wood grade crossing installed in front of the Illinois Fruit & Supply Co.

New road crossings in the Blue Island Industrial District


This morning, I was having a hard time focusing.  I couldn't find tools that were right in front of me.  I did manage to get the cork blocks installed on the fascia (great idea Steve Holzheimer).  These are used as a common place at each town to store brakes (thumb tacks) when required.  I found a 12"x12"x1/2" thick cork sheet online that works well.  It's easy to cut with a utility knife and straight edge.


Removed and replaced seven  plaster road crossings with laser cut wood crossings.  This completes this project.  There are a few places where the plaster road crossings will remain, but don't seem to be causing any issues.

Bureau Junction, IL

Bureau Junction, IL

Bureau Junction, IL

LaSalle, IL

Neighborhood Park at Bureau Junction, IL


I remembered yesterday that I need to close the heat vent over Ottawa.  Last year, I had a problem with a rail kink in that area and I believe it was due to the heat blowing down on the layout.

I started work on the base scenery between Peru and LaSalle.  I had a vision this evening and started installing the styrofoam base.


Pre-Session To Do List Update
1) Complete base scenery between Peru and LaSalle, IL (started)
2) Complete base scenery in West Bureau, IL
3) Complete base scenery between Utica and Ottawa, IL
4) Complete base scenery between Ottawa and Joliet Grain Co.
      * This should complete all base scenery on the layout.
5) Ballast the section between LaSalle and Utica, IL
6) Figure out an appropriate color for the pond by Franklin Farms so that it doesn't look like a nuclear waste dump!  Pour Mod Podge to create lake scene.
7) Plant all trees in my possession
8) Continue ballasting where I can.
9) Work on large Westclox building
10) Complete road crossing project
11) Clean up wiring for LED lights (partially complete)


Monday, October 22, 2012

Progress Report 10.21.12 - Grain Train Thoughts, Pre-Session To Do List

This evening, I was "playing with the trains" as my mom says running a test grain train back and forth across the layout.  For the next session, I was planning to have a unit grain train run from Silvis (inbound from Iowa) to Chicago.  I decided to yard the train and have some of the traffic come from the local pickups.  This way the newly appointed yardmaster can assemble the train and find a crew to send to Chicago.  It provides some operating interest for the yardmaster.  This opens up some new ideas for me.  Outbound loads from the grain elevators may be collected over a few op sessions and then sent out on a unit train vs. simply staging a unit train that magically appeared during the night.

I was thinking I need to create another pre-session To Do list.  I do much better if I have a list to motivate me to complete tasks.  So, without further ado, here we go:

1) Complete base scenery between Peru and LaSalle, IL
2) Complete base scenery in West Bureau, IL
3) Complete base scenery between Utica and Ottawa, IL
4) Complete base scenery between Ottawa and Joliet Grain Co.
      * This should complete all base scenery on the layout.
5) Ballast the section between LaSalle and Utica, IL
6) Figure out an appropriate color for the pond by Franklin Farms so that it doesn't look like a nuclear waste dump!  Pour Mod Podge to create lake scene.
7) Plant all trees in my possession
8) Continue ballasting where I can.
9) Work on large Westclox building

That should be more than enough to keep me busy for a while.


Friday, October 19, 2012

Progress Report 10.19.12 - Upper Level Lightly Canopy Update

Tonight, I worked and completed the construction of the upper level lighting canopy.  I don't have the remaining LED lights though.  Those are on order.  I was able to use less brackets too which saved some money.  The assembly is really strong.  I'm very pleased with how it turned out.

Thursday, October 18, 2012

Progress Report 10.18.12 - The Hunt for Brackets

Two Home Depots, no more brackets.  Doh!!  I found out that SKU was inactive and they were selling remaining stock.  Drats!  Isn't that the luck?  But, a nice store representative was able to find me some at a third store nearby.  Picked up the remaining brackets I needed to ensure I can complete the project.

If you want to get some, better act now.  They come in three finishes: white, black and satin finish.
http://www.homedepot.com/h_d1/N-5yc1v/R-202824716/h_d2/ProductDisplay?catalogId=10053&langId=-1&keyword=steel+shelf+bracket&storeId=10051#.UICbNvnuUfs

No work completed today.  Simply chasing down brackets tonight.

Wednesday, October 17, 2012

Progress Report 10.17.12 - More Upper Level Lighting

Went back to Home Depot to pick up another bracket and some more lumber.  I'll have to find some at another store as I bought out everything at the HD by work.  Yesterday, I partially mounted a 16ft section of LED lights and needed to complete the next section to mount the full string.  The initial purchase the other day was to be a test.  If it didn't work out, I would have return the brackets.

The new valance is really easy to install.  It's rock solid too!  I simply used dry wall screws to mount the steel brackets to studs in the wall.  Mounted the string of lights around the corner over East Ottawa and over toward West Blue Island.

The LED lights I found on Amazon.com are easy to work with.  Simply add a power supply (around $11) and solder the two wire leads.  Regarding the question yesterday, if you need to make a turn, you can always cut the light strip after every third LED (where marked).  Simply solder wire leads to both ends and make your turn.

Below are photos of tonight's progress.  I'm really pleased how it lights up the upper level.  It has always been so dark (even more so evident since lighting the lower level).  I plan on filling in any gaps in the blue back drop later down the road.  That's low on my priority list right now though.


Downtown Ottawa is looking good under the new lights.


Tuesday, October 16, 2012

Progress Report - New Lighting at Ottawa

This morning, I continued to work with various locomotives (not frying any additional decoders) in attempt to resolve some of the performance issues plus get some of the shopped locomotives back on the layout.

I believe I have found a solution for the problematic Proto GP38-2s.  I'll be looking at re-powering those with Altas GP40 chassises.

Today, at lunch, I went to Home Depot to pick up some materials for a canopy over Ottawa to affix the 16ft LED light strip.

This evening, I began construction.  It was pretty simple to build.  The LED lights make a *huge* difference to the upper level.  This was greatly needed last session as it was a cloudy day.  All those sand hoppers begin to look alike on a good day much less on a day when you can't read the reporting marks clearly.

I will hopefully complete this project before the next op session.  My plan is to go in a U-shape providing light along the walls of the upper level.

Below are before and after shots of the area as well as some detail shots of the canopy.

The upper level with the ceiling fan light fixture

My eyes are pretty good, but I can't read the reporting marks under this light.

The new assembly starts to go up.  Two simple heavy duty steel bookshelf brackets turned upside down.

A 2x2 was screwed to the steel bracket.

A 1x3 was screwed to the 2x2.  Later the 5mm luan fascia will be attached to the front.  The LED light string was attached to the 2x2 hidden by the 1x3 and eventually the fascia.

Let there be light!

It appears much brighter on the upper level.

The lights are hidden behind the 1x3 avoiding a blinding glare for the more height challenged operators like myself.

Looking good!  Ottawa has never looked so good in photos.


Wow!  I can read the reporting marks!  Most excellent!

A view from the cat cam looking up.

An overview of the area when you walk in the room.


Monday, October 15, 2012

Progress Report 10.15.12 - Locomotives repaired

One of my Intermountain FP7s was acting up last session requiring engineer Larry to combine the two evening Rocket trains using one locomotive.  The one locomotive that was acting odd had previously been speed matched with other freight locomotives.  The locomotive was making odd noises too when powered up.  I reset both decoders on the FP7s and tested.  All is well now.

I actually need to do that on a few other locomotives that have been acting peculiar.

Well, I started to do just that.  One locomotive was very erratic.  I tinkered with it enough until I fried the decoder.  It was a blaze of electronics glory.  I guess I'll be shipping that decoder off to TCS tomorrow for a replacement.  Hopefully, I'll have better luck with the next one.